Practice | Retouching and Symmetry
Edit the Sample Portrait
Ungraded practice, done in class on Week 11, Tuesday. Take one RAW file from the camera to a finished, layered Photoshop retouch, so you are ready for Assignment 07.
⬇ Download the RAW file
Eden-December-2018-0844.CR2. Save it to your own folder before you open it.
2 apps
Lightroom first, then Photoshop
1 layer
for every retouch, named
100%
zoom for all healing
.psd
the only file you submit
The goal
Fix the photo, not the person. Tone and color corrected, distractions gone, nothing about them changed.
This is what you are making
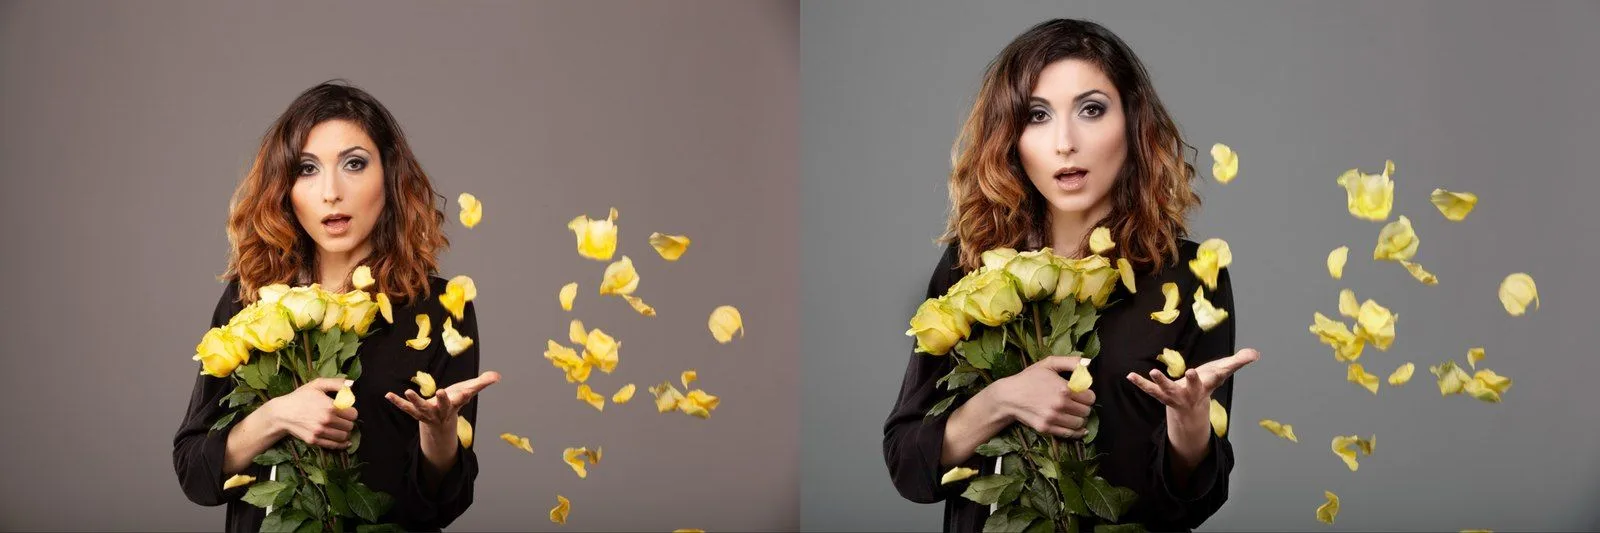
Left, the RAW file exactly as you receive it. Right, the same photo after editing in Lightroom and retouching in Photoshop. Photo by photoclass.org.
Step by step
Follow these in order. The red Watch out lines are where most students go wrong.
01
Download and save the RAW file
Your own folder, before you open it.
• Use the button at the top of this page to download Eden-December-2018-0844.CR2.
• Save it to your own folder. Never edit the original.
02
Global edit in Lightroom
The whole photo, small moves.
• Import the RAW file. Work exposure, contrast, highlights, shadows and white balance.
• Global sliders only. Everything local happens in Photoshop.
• Export it as a JPG.
Watch out: Sliders pushed too far turn skin orange and make the photo look crunchy. If it looks edited, back off.
03
Open it in Photoshop and protect the original
Duplicate the background, then leave it alone.
• Open your JPG in Photoshop. Duplicate the background layer: Cmd+J.
• The background layer stays untouched for the whole assignment.
• Every retouch from here gets its own layer, and every layer gets a name. Double-click a layer name to rename it.
Watch out: Working on the background layer cannot be undone, and it costs points.
Watch out: "Layer 1 copy" is not a name. Call it what it does: Skin cleanup, Hair, Smoothing, Lips.
04
Clean up the skin
Spot Healing Brush (J) on its own layer.
• New empty layer named Skin cleanup. Tick Sample All Layers in the options bar.
• Zoom to 100%. Brush a little bigger than the blemish, one click each.
Watch out: Sample All Layers off? The brush heals nothing on an empty layer. Check the box first.
Watch out: Long dragged strokes smear patches. Click, do not paint.
05
Clean up the hair
Same tool, a separate layer.
• New empty layer named Hair. Sample All Layers on.
• Remove stray hairs crossing the face and the background, one click at a time.
Watch out: Do not erase hair that belongs to the shape of their hair. Clean the strays, keep the style.
06
Smooth the skin
Face only, then scale it back.
• Rectangular Marquee (M) around the face. Cmd+J copies just that area to a new layer. Name it Smoothing.
• Filter, Neural Filters, Skin Smoothing on that layer.
• Lower the layer Opacity until the skin looks smooth but still has texture.
Watch out: Plastic skin is the most common mistake. Real skin has pores. If they look like a doll, lower the Opacity more.
07
Enhance the lips
Saturation, an inverted mask, painted in by hand.
• Select around the lips and Cmd+J. Name the layer Lips. Raise the saturation: Image, Adjustments, Hue/Saturation.
• Add a layer mask, then invert it to black: Cmd+I. The effect disappears.
• Paint it back over the lips with a soft white brush at low opacity. Then fine-tune with the layer Opacity slider.
Watch out: Skipped the invert? The whole area turns saturated. The mask must be black before you paint.
Watch out: A hard brush leaves edges. Soft brush, low opacity, stay inside the lip line.
08
Save As a Photoshop file and submit
The .psd is the only file I grade.
• File, Save As, format Photoshop (.psd). Submit that file here.
• Large files are fine. If it will not upload from home, bring it to class the next day.
Watch out: A JPEG flattens everything, so there are no layers to grade.
Watch out: Use Save As, not Save, or you will overwrite your JPG.
Check before you submit